Tuesday, June 23, 2015

More work on making the Kamaka flat again

I've had just a little time over the last couple of days to work on that Kamaka.

To review, the end block is too long for this instrument, and has pushed both the top and bottom off from the sides. I've already fixed the bottom, and now to work on the top. 


That crack is actually useful, it relieves the stress when I work in the sanding card. 


This is a sanding card. I glued 60 grit sandpaper to a gift card, and cut it down in width. It is flexible, thin, and stiff. 


I work the sanding card in and out, bending it up so that it doesn't also sand the sides. I put some pressure on the top in places as I work the end block down.  

After about 20 minutes, it is getting closer. 


Another 15, and I'm really close. The sides of the block are still too high, so I work these with more pressure.  


Once I was happy with the end block, I then got to work with a tiny sanding block for the bridge area. The bridge was never glued down flat, and there was some pretty thick residue to be scraped away. 

I also used a knife for some of the work. I always forget that I can sharpen these things. 

Well, here is something funny. I was trying to plan for regluing the bridge, and discovered that the bridge brace, called a popsicle brace in the case, is only under the bottom half of the bridge. I put a craft stick in the place where it is attached. Weird! This also complicates gluing the bridge, as I want a nice flat caul underneath the bridge. I'll cut up a craft stick and attach it to the caul, which should balance things out pretty well. I won't do it today, though, I'll just glue the end block. 

Hide glue and some acrylic plates to keep everything flat. I glued the crack too, might as well. 

I also did some gluing on a stenciled Silvertone that I am putting back together. Easy stuff. 
The Kamaka is really coming along, I just need to reglue the bridge, and possibly do a little intonation work with it, and then it will be done. The Silvertone has a few more tight cracks to deal with, but nothing awful. I hope to get back to the Guild and Cromwell later this week.

Monday, June 8, 2015

Opening the top on a Kamaka uke

Today was a hot day, 104 degrees in the forecast. This is great if I need to use heat on an instrument, but not great for me.
The instrument in question is a late 50's, early 60's Kamaka uke, with the most beautiful top I've seen on one of these. The problem is that the uke shrank when it left the moist Hawaiian climate and came to the dry mainland. One part did not shrink, the tailblock, which may have been too long to start with. (These were hastily made instruments. They are wonderful, but let's not pretend that these are master-built instrument.)
I already fixed the back, by running a credit card with sandpaper on it through the rack, reducing the tailblock to the correct size. Now for the front, which is better attached, has a big crack in the top, and nothing is moving.

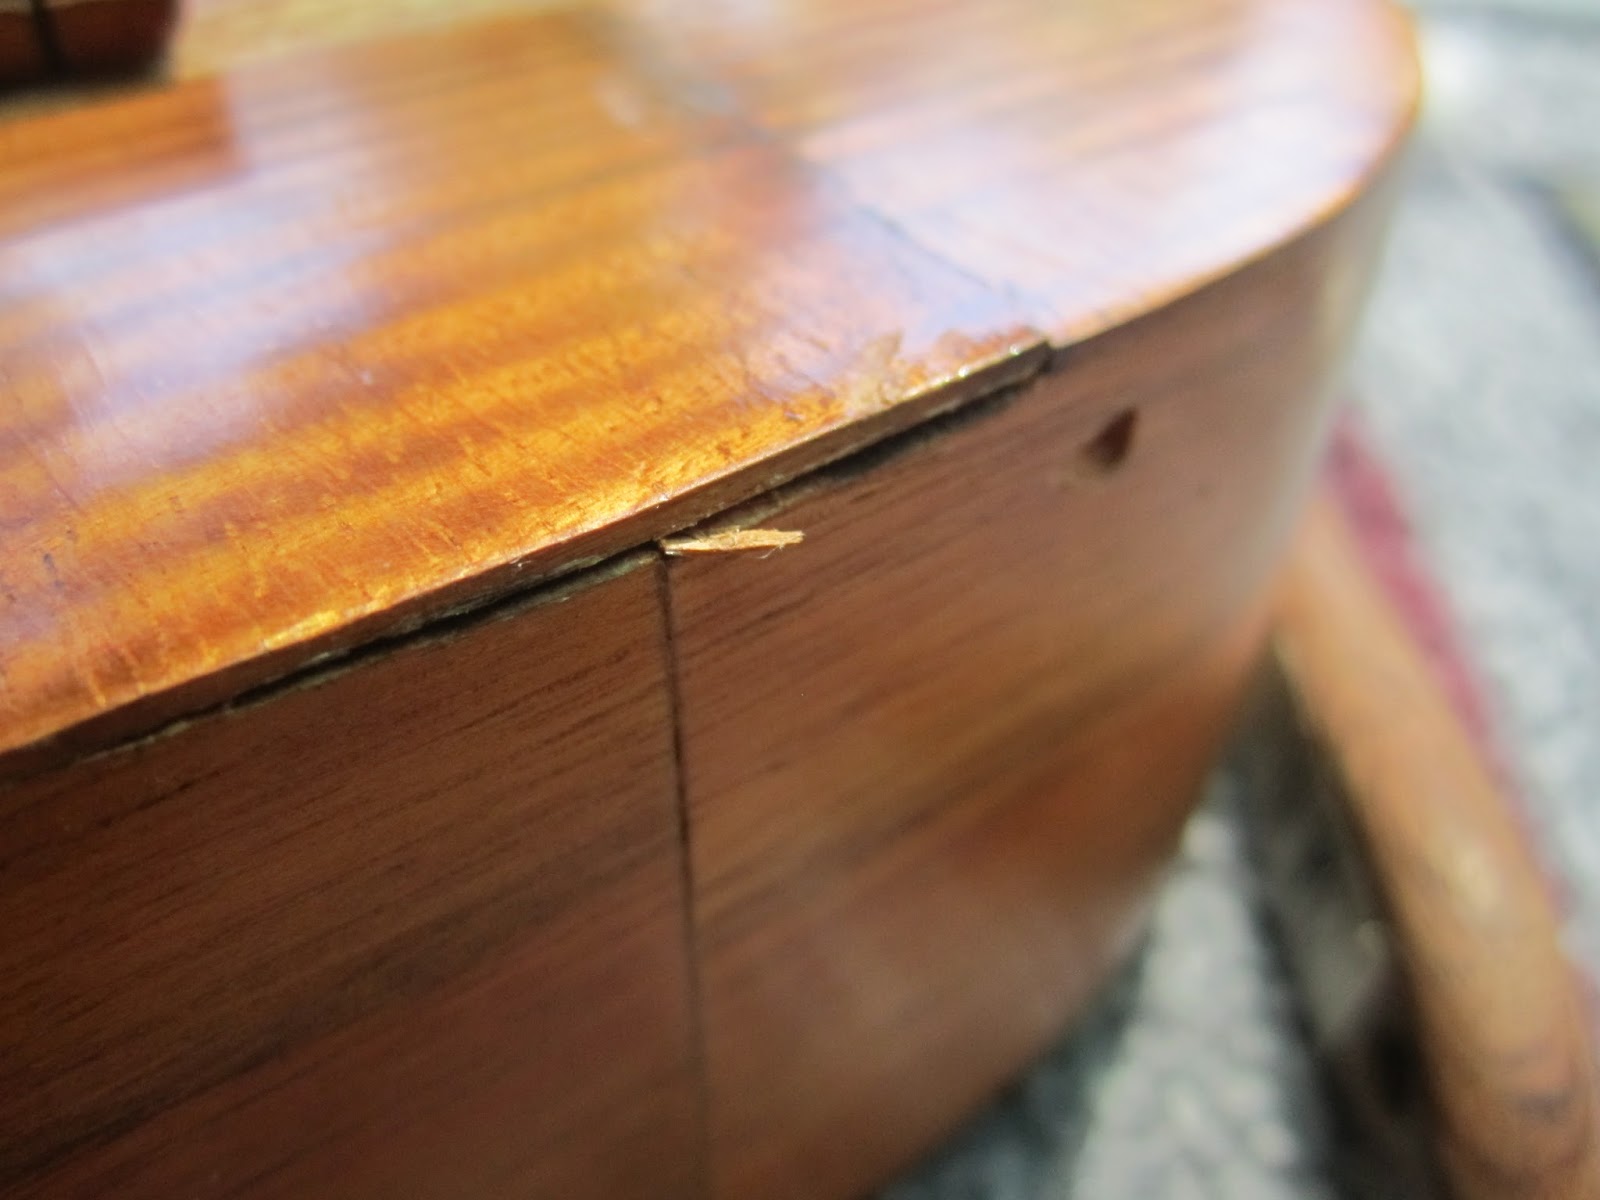
That little gap at the top is what I'm working on. 

I really don't want to lose that little splinter of wood, if I can help it. 

And here is the crack, which follows the grain of the top. The bridge is all tilted and not down very well. 

I heated up a palette knife with my alcohol lamp. I also used a pipette to drip in a little water from time to time.  

After a bit of water and jsut a little prying, the bridge popped off. Notice how little of it actually made contact with the top. I'll have to clean off this glue and make sure that the contact is much better.  If you look carefully, there is a spot of white haze under the right side of the bridge on the top of the uke. This was the result of a bit of steam coming off the palette knife when I put it into the water. I wiped that with alcohol and it went away. 
Sure enough, that splinter cam loose. Now what? 

I grabbed a sticky note, and stuck the splinter to it. 

Fold it up, and stick it in the case. I can put it back when it is time to glue things back together.


After about a half-hour of careful prying and heating, I was able to loosen the top. I decided to stop and let things dry out before I went on. 

Saturday, June 6, 2015

More Cromwell back braces, and a red herring for the pickguard.

I'm covering a few days of work here.

This brace looks really good, unlike the other two. 

But, looks are deceiving. This brace is loose through the middle, which is an odd place for a brace to be loose. Regardless, it needs to be glued. 

I covered up the label, and put tape down on both sides. 

I used my cutters to make craft sticks with a notched end so that they would stay on the brace. 

A quick test shows that they fit snugly. I didn't get any shots of gluing the brace, but I basically put glue on the tape and worked it in with my bent palette knife. 

The soundhole was right where I need the sticks, so I made a bridge out of one stick to push the brace 

A cotton swap in a needlenose plier cleaned up the mess. 

The next day, it looked pretty good, and it was solid again. 

Now for that last brace, way in the back. That fracture at the end of the brace needed to be glued in the split and glued to the back as well. Luckily, the soundhole on the Cromwell is big enough that I can stick my arm in all the way, and touch this area.  
I started putting down tape. That hole in the bottom of the guitar sure lets in a lot of light! 

As always, I had to cover up the label. 

I made several braces, and test fit them. There is a top brace above the bottom brace, so I notched both ends of the sticks. 

Getting glue back there was going to be a major chore. I started filling pipettes with glue. 

I made six. It wasn't enough. 

This is before I did the cleanup. As you can see, it took a lot of clue, and a lot of mess, to really get things taken care of. This is so deep in the guitar that the mess isn't really a problem, but I wasn't too happy about it. The good news is that I got glue everywhere it needed to be, and the end is really well glued now. 

I decided to start work on regluing the pickguard. 

I traced the pickguard onto blank paper. 


Using a magnet and a pencil, I traced the braces from underneath the pickguard. 

I also used a contour gauge to show how deep the braces and the bridge patch are. 


The next day, the inside of the guitar is messy, but everything is solid. 

I made copies of my tracing, and cut one out. 

I glued the cutout to a stiff piece of particle board. 

Then I looked at the guitar again. 
Do you see the problem? The area the pickguard is going to sit is curved, due to the belly in the top. I can't clamp this flat, it would, at best, distort the guitar, and more likely it would cause some damage. So I stopped making the clamping caul, and I will instead order some adhesive film to reattach the pickguard. I didn't lose too much time to this, and I'm glad I figured this out before going any further.

Thursday, June 4, 2015

Gluing back braces

Not a whole lot to talk about in this post.

I want to try to get this parth to match the rest of the guitar a bit. 

Perhaps a suntan? I left it in the sun for about two hours, with an alarm going off every ten minutes so that I would move it around. There was no difference, so that was a wash. 

I spent some time adjusting the dovetail on the Guild D35. 

I did some tinting on the new patch on the Cromwell. 


This is looking really good. 

Last, I glued up one back brace on the Cromwell. This is really fiddly stuff, and I decided to use Titebond, because there was no way I could get it glued and braced quickly enough for hide glue. Maybe I could if the back was off, but I'm not going there. The braces are craft sticks that I cut off to be the correct length. I think this will work nicely.